Friday, July 20, 2012

How to make your own curtains


I needed some curtains for my little girls room but wanted something cute. Curtain shopping is really tedious and at times frustrating. I couldn't find anything that I absolutely fell in love with. I happened to be shopping around at Joann fabrics and found this fabric. I fell in love! to top it off,  had a 40% off  coupon, and a 50% of coupon so I bought this beautiful flower fabric and a polka dot one to match.
This is one of the windows I need a curtain for. Both of my windows measure the same. I measured after I had my fabric, but it would have been better to measure it before I got my fabric.


I took my paper tape and measured it across from one side of the trim to the other. I also measured it from the top of the trim to the very bottom. My window measured 43.5" high and 37" wide.
I had 1 yard of fabric that was 44 inches wide so thankfully it was perfect since I didn't measure before I bought my fabric.


I didn't have to cut my fabric because I wanted the width longer, and after I hemmed it all up, my length would be perfect too.


First, I folded one side over 1/4 of an inch. I didn't iron this down, I just eyed it all the way. If you prefer to iron, that's fine. After I was done with that side, I folded it over again another 1/4 of an inch and sewed it all the way down. I did all 4 sides just like this.


I used some extra fabric I had to  make the casing for the curtain rod. I measured from one side of the hem to the other then added an inch.


For my casing I measured down 2.5 inches and my length ended up being 43".


After I cut my casing, I ironed both ends in 1/2 an inch and 1 side 1/4 of an inch.


I measured down 2 inches because I wanted a little ruffle at the top. I used my fabric marker to mark all the way across.


I put the side of my casing that I didn't fold down on the line just made. Following along this line, I sewed it all the way across.


The top of the curtain is on this side


After I sewed down that whole side, I flipped the casing down and sewed down the side we ironed down earlier.


I know the picture didn't turn out well, but here it is all done. I love how it turned out!

Wednesday, June 13, 2012

How to make Kanzashi flowers flat

I have my tutorial for this Kanzashi flower for sale in my Etsy Shop. 
This tutorial is to help if someone wants to make these flowers flat because they can be quite tall.
 

After you follow the tutorial and have all your petals made, cut the back off like this but make sure you don't cut the thread.

You should now have a petal that looks like this


You will need to open the petal so when you heat seal what you just cut, everything won't stick together.


This is what the finished flower will look like after it has been put together. I added a pony-o to this one  but you can put yours on any clip you like. 


I hope you find this useful:)
 

Friday, June 1, 2012

Shirring: Brother Poject Runnway Sewing Machine

Anyone who has one of these machines knows how hard it is to figure out how to shirr because of the automatic bobbin feeder. I have found a solution.. I am sorry for the quality of the video I had to do it on my phone. Hopefully, as you follow along, you can see what I am talking about.


Here are some pictures if you want a clearer picture:
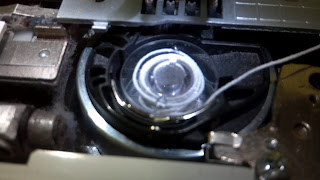
See the notch in the middle? That is where the thread goes.

 Here you can see where I have the thread
 Pull the elastic thread over

 Hold on to the thread that's on the needle and when you manually move the needle down and back up, gently pull on the thread you are holding and it will help bring the elastic all the way up. Put your machine back together and you are almost ready to go.
I set my tension on 9
 and the length to 3.5
This is what it looks like after a few rows

If you have any questions, feel free to leave me a comment:) 

Friday, March 30, 2012

Toilet paper seed starter

I can not take credit for this awesome idea. I got the idea from a friend of a friend.. who knows where she got it from. I am going to share it with you all today.

First, I cut the toilet paper rolls in half (my big helper did that for me). 
We lined them all up in a box that I cut in half
Then I held the rolls in my hand while I packed the dirt in the bottom half.
view from the top
view from the bottom
 Here they are! All done with the seeds.. when I put the seeds in, I just lightly put dirt over them I didn't pack it.

I am so excited to see our new things grow!!

Wednesday, March 7, 2012

Faux Chenille Blanket

 I found the tutorial for this blanket on MADE. I also looked at the tutorial on Aesthetic Nest because I liked the idea of using flannel.
 The only directions I didn't follow on MADE is I didn't use the adhesive spray or pins. I found that the flannel sticks to itself and anything else that it is on naturally. I also didn't have the same problem Aesthetic Nest did with the flannel stretching because instead of sewing with the flannel side up, I sewed with the fabric side up to prevent stretching of the flannel.
Cutting was very tedious but I really don't think the cool gadget Aesthetic Nest had was really necessary. Would I complain if I had one? umm.. no especially after my hand was killing me when I got done. This blanket was SOOO worth the end result! I love it!

Thursday, February 23, 2012

Alfredo Sauce

I could not believe how fast and how good this was! I am going to have to double the recipe next time because my girls just scarfed it down!

1/2 cup of butter (1 stick)
1 pkg cream cheese (you can use low fat to make this a low fat recipe)
2 cups of milk (approx.)
2 tsp. garlic
dash of salt
pepper to taste
1 6oz pkg shredded Parmesan cheese

Melt the butter in a non stick saucepan. After it's melted, add the pkg of cream cheese. When the cream cheese starts getting soft, add the milk a little at a time until all the lumps of cream cheese are gone. I really like garlic so I added a little more than 2 tsp but you can add what you want. I also didn't add the salt or pepper to mine, but again, just a preference. After this add the whole pkg of Parmesan cheese. This should thicken up as it sits. If it doesn't seem thick enough to you, just cook it longer.
You can add shrimp, chicken, or nothing at all. Mix in whatever noodles you prefer to use and Enjoy!


Friday, February 10, 2012

Bubble Top

I was so honored to be asked to test this adorable pattern from Ceate Kids Couture. I couldn't believe how easy this pattern was!! Just 4 pieces of fabric and look at how adorable it turned out! Do you want to make one too? The pattern is available for purchase at Create Kids Couture Etsy Shop. I hope you enjoy it as much as I did.